9May2006 (Updated 8Jun2006)
Subject: Upgrading the Cisco ATA-188 or ATA-186
for Asterisk@Home/Trixbox.
The purpose of this paper is to document the processes involved in preparing/upgrading the Cisco ATA-188 & ATA-186 to be supported by Asterisk@Home/Trixbox or Asterisk. The main difference between an ATA-186 and an ATA-188 is an additional Ethernet Link to support a PC; both support Phone 1 & 2. I will refer to the ATA-188 for the remainder of this article.
The ATA-188 comes with the SCCP (Skinny Client Control Protocol – Skinny Protocol) image loaded and must be upgraded to support SIP/H.323 for Asterisk@Home.
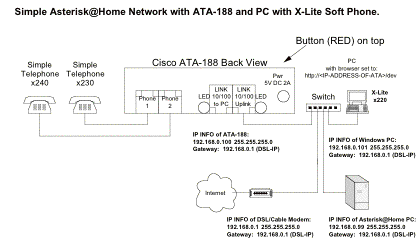
Figure 1 - Hardware Setup Diagram:
Menu Options for the ATA-188 (assuming it is not locked for a specific VoIP provider):
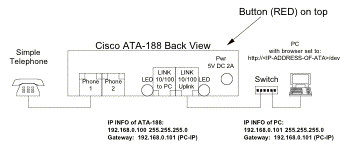
· To access the menu, lift the telephone and press the Button (RED) on the top of the ATA-188.
· List of options available:
o
322873738# will
reset the unit to factory defaults after entering ‘*’.
o
123123 Build
date of Cisco software
o
123 Software
Version Number
o
1 Set
Static IP
o
2 Set
Static Network /Gateway Route
o
10 Set
Static Subnet Mask
o
20 Controls
DHCP info receive
o
21 or 80 Review
IP Address
o
22 Review
Default/Gateway Route
o
23 Review
Subnet Mask
o
24 Review
MAC Address
o
100 Upgrade
Software – enter IP address
o
101 Changed
prompts to English on upgrade
o
OTHER MENU OPTIONS:
§
35 Number
Tx frames per packet transmitted
§
38 MGCP
Signaling Protocol
§
81 Printer
address for debug messages
§
202 Media
Port base port for RTP media streams
§
255 UDP
TOS bits precedence and delay
§
300 LBR
codec – Low-Bit-Rate codec selection
§
305 Use
TFTP – Enables TFTP as config method
§
311 Connection
Mode of call signaling protocol
§
312 Audio
Mode allowed finer control
§
316 Caller
ID Method
§
318 Signal
Timers
§
320 Encrypt
key for TFTP file on server
§
905 TFTP
URL – IP Address of server
§
916 DNS
1 IP
§
917 DNS
2 IP
§ 7387277 Set Config Interface Password?
To setup the required IP Address in Figure 1:
- Pick up the phone
- Press Button (RED)
- Set DHCP to “0=NO”:
- 20# 0# 3
- Set IP address:
- 1# 192*168*0*100# 3=saved
- Set Subnet Mask:
- 10# 255*255*255*0# 3
- Set Default/Gateway Route:
- 2# 192*168*0*117# 3
- Hang Up the phone to set the parameters
- Pick up the phone
- Press the Button (RED)
- Check the above values:
- 21 IP Address
- 23 Subnet
Mask
- 22 Default/Gateway
Route
Now see if you can access the device from the PC’s web browser:
You should have the web screen showing from the ATA-188 device.
Check at the top of the screen to see if it is running “SCCP”. If it is, you will have to upgrade the software to “SIP / H.323” software for Asterisk@Home or Asterisk.
If you need maintenance on your ATA-18x, it is very reasonable at approximately
$8/year for upgrades and replacement of the unit.
You will need a Cisco current contract to access the software .zip file on the Cisco
website http://www.cisco.com or at least a current active site logon.
This is the link to the Cisco web site for “Upgrading the Cisco ATA Signaling Image”.
The document is slightly dated but the important parts are included below.
You must download the new signaling image from cisco.com:
Example file name: ata_03_02_00_sip_041111_1.zip for the 3.2.0 version.
This is the current version as of the date of this paper.
If you search www.cisco.com for the file name above, it will not allow you to go
to the download site without a “Cisco login”.
STEPS
TO UPDATE TO SIP FROM SCCP:
·
Create a new folder on
your PC to hold the zip file
·
Downloaded file from www.cisco.com for SIP/H.323 into the new
folder:
o ata_03_02_00_sip_041111_1.zip
o unzip the file
· Start the program on the PC attached to the same network segment:
o
Open an MS/DOS window and ‘cd’ to the new folder with the downloaded
information unzipped.
o sata186us.exe –any –d1 ATA030400SIP041111A.zup
§
sata186us.exe = the
program name to run
§
-any = from any device
requesting – any build version
§
-d1 = debug messages level one (or 2
or 3=maximum)
§
File name in the .zip
ending in .zup
o
This program will wait
for you to enter the touchtone command on the phone attached to the ATA-18x on
the “Phone 1” connector.
o
Assume the PC is
192.168.0.101 IP address
· On
the ATA-188 (or ATA-186):
o
Lift receiver
o
Press button (RED)
o
You will here prompt,
enter:
§ 100#192*168*0*101*8000#
·
100# = upload from a PC the new image
·
192*168*0*101* = IP
Address of the PC running sata186us.exe program (above)
·
8000# = the default port
to communicate over
§
The MS/DOS window will
show the status and the button (RED) will flash during this activity.
§
Wait for the “Upgrade
Successful” voice prompt on the telephone
§
Hang up the phone and
check the web browser and you will find out the screen title is now “Cisco ATA
188 SIP” or use the voice menu options 123123 and 123.
o
If you need to change
the IP parameters, do it on the phone before moving it to the appropriate
network segment.
· The
download worked the first time – very easy.
You must configure the ATA device before access to Asterisk@Home or Asterisk.
From the document by John Todd on the Internet: jtodd@loligo.com.
His guide can be found at http://www.loligo.com/asterisk/Cisco/
In his guide, John Todd quotes a typical configuration for an ATA-186. It also worked for the ATA-188. Here it is from his document (I will add any changes for the ATA-188 in BLUE.): Also some of the above info was from his document. John has more depth into the purpose of the options for later reference.
Set up our sip.conf file for Asterisk (From John Todd’s document – see below): A typical configuration for an ATA-186 would look like this:
[2299]
type=friend
username=2299
secret=lordwhorfin or 1234
canreinvite=no
host=dynamic
dtmfmode=rfc2833
mailbox=2299
nat=1
"[2299]"
is
the name of this extension, and should be the same as the username
"type=friend"
means that this
device can both make and receive calls
"username=2299"
is
the username of the ATA-186 for authentication
"secret=lordwhorfin"
is
the definition of the password for this particular line
"canreinvite=no"
means that we don't want SIP endpoints
talking to each other
directly. I still haven't
been able to make REINVITEs work when either end is behind a NAT, so I just get
lazy and set everything to "canreinvite=no"
"host=dynamic"
means that this ATA-186 will move around
to different IP
addresses and it will use the REGISTER method to tell the
server
where it is.
"dtmfmode=rfc2833"
this
defines how we pass touch-tones between the ATA-186 and
the Asterisk server. The ATA should work with RFC2833 (or "avt")
delivery methods, as I have not had problems with it with the exception of when
I'm using Iconnecthere.com or any other Cisco device at the far end. Asterisk for some reason refuses to
strip out the DTMF signals and re-send them as something that can be understood
by the far end. I have no idea how
to fix that other than setting "dtmfmode=inband" which actually sends
the tones as audio data, which doesn't work very well (if at all.)
"mailbox=2299"
tells Asterisk to look in mailbox 2299
and send a NOTIFY back to
the ATA-186 when there is mail in that
box. The ATA-186 will play a stutter dialtone if there is voicemail.
"nat=1"
should
be set, even if the device isn't behind a NAT or PAT. It
doesn't hurt to turn it on.
Note that each line must have it's own distinct and complete configuration, and if you use both lines on the ATA-186, it will REGISTER twice. Further note that you cannot call one line from the other on the same device using the "direct" extension numbers, so you will have to be clever about naming and aliases within Asterisk. That is outside the scope of this document.
A typical configuration for an ATA-188 (both lines 230 & 240) would look like this:
[230] [240]
type=friend type=friend
username=230 username=240
secret=1234 secret=1234
canreinvite=no canreinvite=no
host=dynamic host=dynamic
dtmfmode=rfc2833 dtmfmode=rfc2833
mailbox=230 mailbox=240
nat=1 nat=1
I setup two extensions in Asterisk@Home 2.8 (For more security, change secrets.):
Extensions SIP For Phone 1 Phone 2
Extension
Number: 230 240
Display
Name: ATA
230 ATA 240
Secret
1234 1234
Voicemail
& Directory: Enabled Enabled
Voicemail
password: 1234 1234
Go to the main configuration page via a web browser
Now that you have reset the device and know the IP address
of the unit, you'll need to configure it through a web browser. In our examples, we'll assume that the
IP address of the unit is 192.168.0.100. Pull up your web browser, and enter:
http://192.168.0.100/devYou should now see a menu
with "Cisco ATA 186 Configuration" emblazoned at the top of the page,
with a bunch of options listed down the page.
NOTE: If you get a screen
that has only three possible entry blocks and says "Enter UI Password",
then the device has not been reset.
Attempt the reset configurations again, and if that does not work, it
may be the case that you have a device that cannot be reset (v2.16 and up - see
other notes)
Change the settings to match your Asterisk server:I will only describe those
settings which are required to be altered, and why. A complete example of an Asterisk-compatible ATA-186 is
included at the bottom of this guide, with all fields intact. You will not need to alter most fields,
so anything that is not explicitly referenced here can probably be left
alone.
Where I list IP addresses, I would suggest using IP addresses and not hostnames. The ATA can resolve names to IP addresses, but unless you have a good reason to use names (large distributed environment, boxes that "disappear" behind NATs out of your control where changing config data may be impossible, etc.) then I would suggest that you use IP addresses. An intelligent network administrator should be able to evaluate which method they will use for their particular configuration.
ON ITS OWN SCREEN:
UIPassword: This is the password that will be used to control
access to the http://192.168.0.100/dev
configuration menu. I strongly
suggest leaving this alone until you
have worked with all of the other values in the file and have them set the way
you want. I would suggest you use
a numeric value here, since you want something that can be typed in through the
keypad in case that is required (see Cisco's user manual on that process.)
ToConfig (NOT FOUND IN ATA-188): Set
this to "0". This
is the flag that tells the unit if it's been configured or not, and since
you're now configuring it, it can be set to "0"
FOUND ON NETWORK SCREEN (Set to “1”):
UseTftp: This value should be set to "1" even if
you're not using a TFTP server to modify your configurations. Why? To get around a bug. The ATA-186's will, when used with
Asterisk in particular, sometimes get wedged. They won't send their REGISTER updates when they should,
thus making inbound calls impossible.
So, someone posted a solution which was to trick the box into rebooting
every N seconds, which un-wedges them.
Yes, it's a kludge, but as of v2.16 this has not been solved, so we have
to configure those settings, which tell the system that it needs to
reboot. The three settings are
UseTftp, TftpURL, and CfgInterval.
Note that when the device reboots, it is unavailable for 30 seconds.
FOUND ON NETWORK SCREEN (Set to ‘192.168.0.250’ no device
there):
TftpURL: Enter an IP address that you know isn't running a TFTP
server. Yes, strange, but it's
faster to get a "reject" than it is to get a timeout. Supposedly you can leave this blank and
it will use whatever it gets from the DHCP server, but that is usually not set
to anything, so put in an IP address of something you know isn't running
tftpd. (format is just
123.123.123.123 - no URL specifier required)
FOUND ON NETWORK SCREEN (Let it set to default: 3600):
CfgInterval: Set this
to the number of seconds between forced reboots to clear wedging. 86400 (one day) is a safe number.
FOUND ON NETWORK SCREEN (Set to ‘0’):
Dhcp: 0 for "off" and "1" for on. If set to "on", then Static
IP address config items will be ignored (though they will still retain their
settings if you set them; they just won't be used.)
FOUND ON NETWORK SCREEN (Set to ‘192.168.0.100’):
StaticIP: IP address of this box, if you need to statically set
it
FOUND ON NETWORK SCREEN (Set to ‘192.168.0.1’):
StaticRoute: Static gateway IP address for this box, if you need to statically set it
FOUND ON NETWORK SCREEN (Set to ‘255.255.255.0’):
StaticNetMask: Static
network mask for this box, if you need to statically set it
FOUND ON SIP PARAMETERS SCREEN (Set to ‘230’):
UID0: This is the Username for line #1. This is the same as the username in
your "sip.conf" file for a SIP peer. Thus, you would enter "2299" if your sip.conf
looked like our example listed at the top of this document.
FOUND ON SIP PARAMETERS SCREEN (Set to ‘1234’):
PWD0: Using the example above, enter "lordwhorfin or 1234" in here as the password for line
#1
FOUND ON SIP PARAMETERS SCREEN (Set to ‘240’):
UID1: Same thing as UID0, but for "Phone 2" jack
FOUND ON SIP PARAMETERS SCREEN (Set to ‘1234’):
PWD1: Same thing as PWD0, but for "Phone 2" jack
GkOrProxy(CANNOT
FIND): Set this to the IP address of your Asterisk server.
SET “Proxy:” to the Asterisk@Home
server’s IP address.
UseSIP(CANNOT FIND): Set this to "1" so we are using SIP instead of H.323
FOUND ON SIP PARAMETERS SCREEN (Set to the default):
SIPRegInterval: Set this to
the number of seconds between REGISTER attempts. This is how often the ATA-186 sends a "heartbeat"
to the SIP server, which tells the server the phone is still "alive"
and also tells the server what IP address that number can be reached on. If you are behind a NAT or PAT, I
would suggest a very low timer here, something like 120 seconds. This is because NAT or PAT gateways
will 'time out' mappings between the outside world and the inside private IP
addresses unless traffic keeps trickling through the mapped settings. Unless you have a very large number of
phones, the increased REGISTER traffic will not adversely effect your Asterisk
server. If your ATA-186 is on a
"real" IP address, I would suggest leaving this number fairly high,
like around 1800 or 3600 seconds, because there's no need to keep sending the
heartbeat more frequently.
At the time of this writing
(2003-06-28) it may be the case that there are two other options rather than
reducing the SIPRegInterval to keep NAT/PAT mappings open, but they both rely
on the Asterisk server. It appears
that the Asterisk server sends a NOTIFY to the ATA-186 every minute regardless
of voicemail status, and the replies for this may help to keep NAT/PAT mappings
active. It is also possible to
specify a "qualify=" statement in the sip.conf for each peer, which
will request a SIP "OPTIONS" call on each ATA-186 every minute, and
then time the response interval.
This can serve two purposes: it will gauge the response time of the
network between the ATA-186 and the Asterisk server and remove any phones that
reply in an interval greater than that specified by the "qualify="
line. Secondly, the OPTIONS
request will generate traffic and keep the NAT/PAT session alive. If you don't understand what any of
this means, don't worry about it and just set SIPRegInterval to 120.
FOUND ON SIP PARAMETERS SCREEN (Set to ‘1’):
SIPRegOn: Set this to "1" so that SIP REGISTER messages are sent.
NatServer, NatIP, NatTimer: Ignore these. You might be tempted to fool with them, but you SHOULD NOT MEDDLE WITH THEM. It will only lead to heartache and woe. Asterisk takes care of all the details; don't try to outsmart the system.
FOUND ON AUDIO PARAMETERS SCREEN (Set to ‘0x00140014’ no
VAD):
AudioMode: Lots of
settings are contained within this binary number, but we're only concerned
about one bit for each line. Your
voice calls will sound better if you turn off VAD (also known as "Voice
Auto Detection" or "Silence Suppression") on each line. VAD causes data packets to stop flowing
if you are silent, which leads to some voice clipping of the first few
milliseconds of each time you talk, and also leads to some strange silences on
the line which make people ask "Are you still there?" more frequently
than is normal. The default
setting of "0x00150015" has VAD turned on, but setting this register
to "0x00140014" turns it off for both lines.
FOUND ON SERVICE PARAMETERS SCREEN (NOT CHANGED!):
ConnectMode: If you have a
system with v2.15 or earlier, you will need to modify this setting. In order for the ATA-186 to work
properly behind NAT or PAT systems, it needs to do some clever analysis of the
headers in replies to its initial REGISTER messages. To turn this processing on, set ConnectMode to
"0x00460400". The
default is "0x00060400"
NOTE: If you have v2.16 you MUST NOT CHANGE THIS SETTING. Cisco confusingly changed the meaning of that bit in v2.16, and has Via: header processing turned on by default. In other words, if you have v2.16, you're fine. Don't mess with ConnectMode.
FOUND ON SERVICE PARAMETERS SCREEN (Set to ‘18’ for Mountain
Time):
TimeZone: Some phones
set their date/time from the caller ID clocking messages, and you'll need to
set the appropriate timezone in your ATA-186 so it can give the right date/time
data to your phone. The
formula for how the phone sets it's clock is: (Local Time=GMT + TimeZone, if
TimeZone <= 12) or (Local Time=GMT + TimeZone - 25, if TimeZone >
12) Let me say right here that
this is one of the DUMBEST and most INCONVENIENT ways of setting a timezone
I've ever seen in my life. Why
isn't this just a GMT offset, guys?
Anyway, Pacific Coast USA time is the default at "17",
Mountain is "18", Central is "19", and Eastern is be
"20". GMT would be
"0", and the rest of Europe gets better math scores than we loutish
Americans, so you can figure it out on your own. I have no idea how it handles daylight savings time; I have
not experimented with that setting.
FOUND BACK ON NETWORK PARAMETERS SCREEN (Set to
’17.254.0.31’):
NTPIP: Set this to the IP address of your favorite NTP
(Network Time Protocol) server. I
use time.apple.com at 17.254.0.31
FOUND BACK ON NETWORK PARAMETERS SCREEN (Set to
’17.254.0.26’):
AltNTPIP: Set to the IP address of your favorite NTP backup server. I use the other address for time.apple.com at 17.254.0.26
Test/Debug:
The device will reboot when you hit "Apply". I would suggest that you install
the ethereal package and then use the "tethereal" command-line
application to watch SIP messages and their responses. Example: "tethereal port
5060". This will tell you far
more than any debug messages can hope to offer.
If the phone successfully registers on the Asterisk server, you will see within 30 seconds or so a note like this on your Asterisk console:
"--
Registered SIP '2413659251' at 18.33.17.3 port 28705 expires 120"
Try calling the line from some other
phone. Voila!
If the phone rings, but you get no
voice channel, you've got a NAT/PAT problem where RTP isn't getting through but
your SIP messages (port 5060) are.
This is more complex than this guide can cover - see the Asterisk
mailing list or the IRC channel.
If the phone does not ring, see if your
SIP messages are making it from the Asterisk server to your ATA-186.
If the phone does not successfully
register with the Asterisk server, make sure your outbound messages are making
it to the Asterisk server, and that your replies are being sent back to the
correct destination IP address.
Optional codec settings (Set to ‘0’, ‘1’, & ‘1’ defaults settings):
If you have purchased the G.729 codecs from Digium ($10 per concurrent channel license - worth it just to have 'em) then you need to set the following options:
LBRCodec:
3
RxCodec: 3
TxCodec: 3
Default settings: (FOUND ON THE AUDIO PARAMETERS SCREEN.)
LBRCodec:
0
RxCodec: 2
TxCodec: 2
Using the G.729 codec will
reduce the bandwidth between your ATA-186 and your Asterisk server to around
30kbps per active channel, versus around 82kbps per G.711 channel (the
default.) Sound quality suffers
slightly, but it's still better than a cell phone IMHO.
Misc:
http://192.168.0.100/reset = resets device without pulling the plug
http://192.168.0.100/stats = short statistics for RTP sessions/software rev
http://192.168.0.100/refresh = request TFTP files for
this device (not covered in this guide)
References:
http://www.cisco.com/univercd/cc/td/doc/product/voice/ata/
http://www.asterisk.org/
http://www.djernes.org/~shawn/ata186.htm
Full Example configuration for ATA-186 v2.16 from John Todd’s document: