Archive for the ‘Tech/Net/Computer’ Category

Windspeed A/D Dials

Wednesday, June 17th, 2015
Finished product - dials and arduino all working

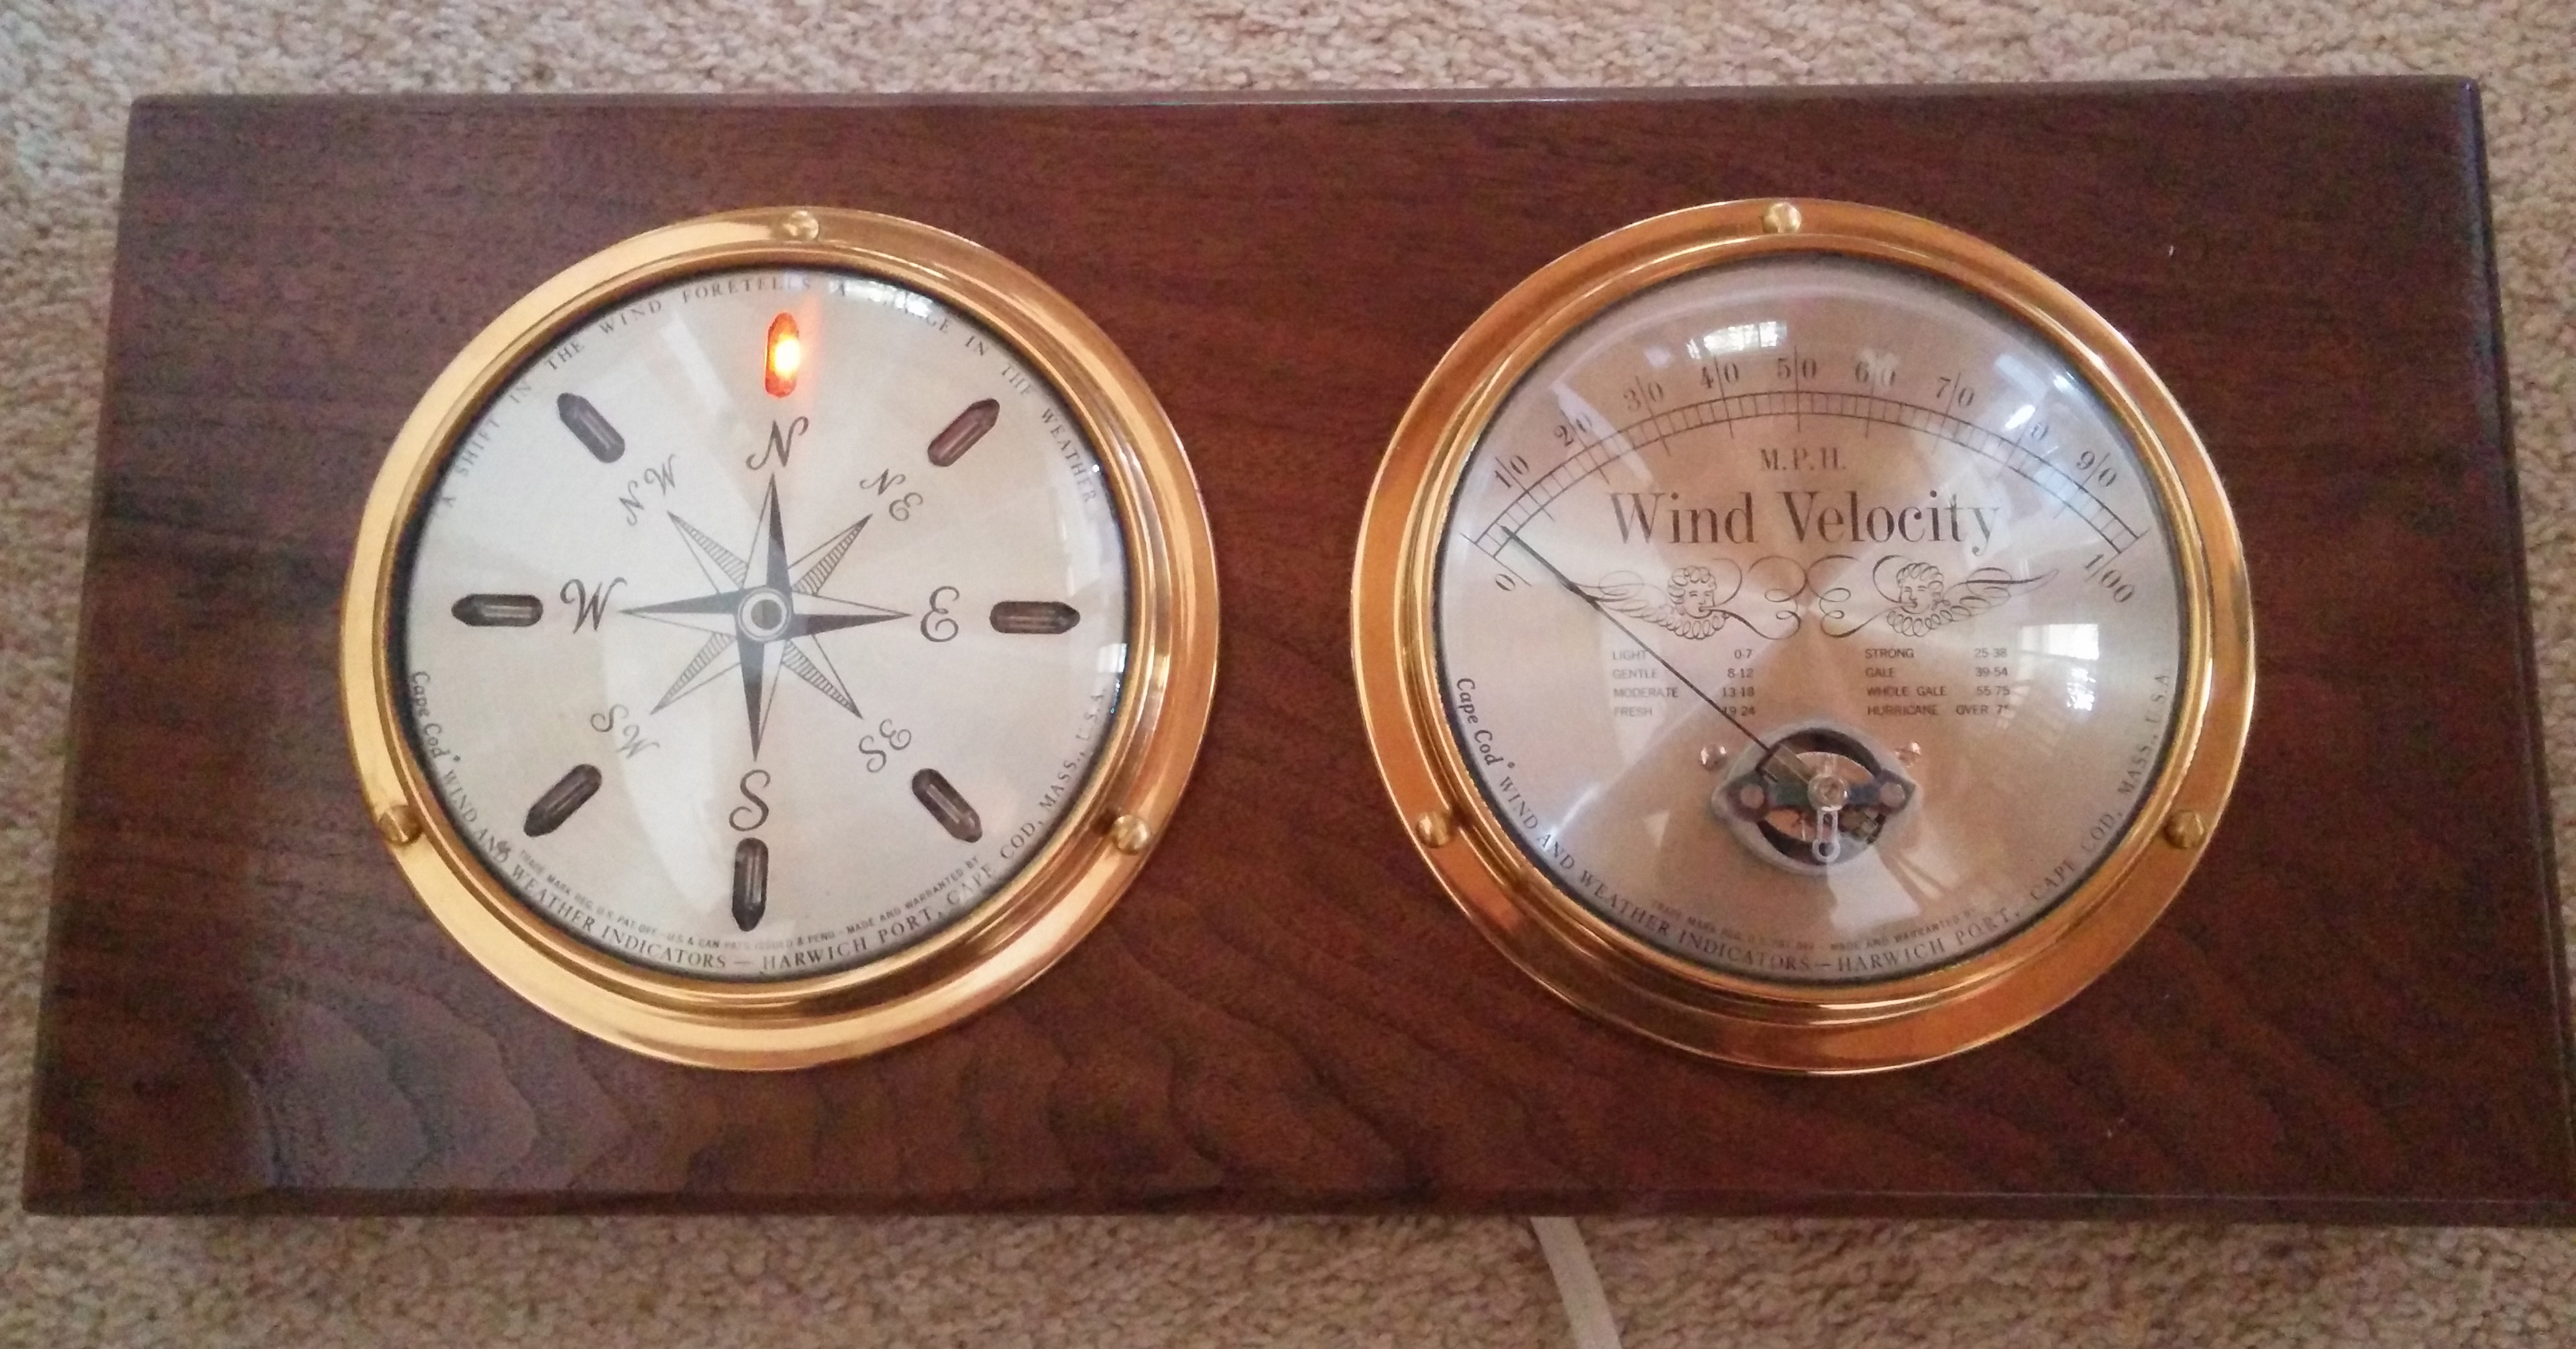
Finished product – dials and arduino all working

My father and grandfather were sailors (amateur and professional, respectively) and would pay attention to the weather.  Whenever we moved to a new house, a set of windspeed and direction indicators would appear on the wall – brass and glass, with lights for compass direction and a needle to show the windspeed.  These faded into the background for me growing up – they were always there, so I just never really thought that they were unusual.

Now that I live outside of the sheltered city, weather has more of an important role in my own life. I pay attention to where the wind is coming from, and how fast. I put a windspeed measurement and direction system (and temperature/humidity/rain measurement) on my 100′ tower so I could get a fairly un-sheltered perspective of the wind, and that worked great.   But I think that looking at a screen for seeing windspeed and direction is tedious, and often it will just be hidden behind other screens and so I’ll never look at it.  I needed the brass dials on the wall.  My hobbies, after all, have me living in the past – I like analog.

So I decided to blend the digital and analog worlds.  This project set out to get the old-time analog gauges working with my modern digital weather station, and also about getting a bit more hands-on time with Arduino.  This is one in a long line of analog-to-digital converters to get the speed and direction of the wind visible to me while sitting inside.

Goal

I wanted to create a wall-mounted analog gauge set that would take an HTTP GET command and set the direction and speed.  The device would have to be wireless, only relying on a plug to get AC power.  It would have to look nice, with maybe cherry or walnut mounting board and to the untrained eye look identical to a weather gauge set that was run by analog methods. It would have to be tremendously simple for my ham-handed API calls.

Components

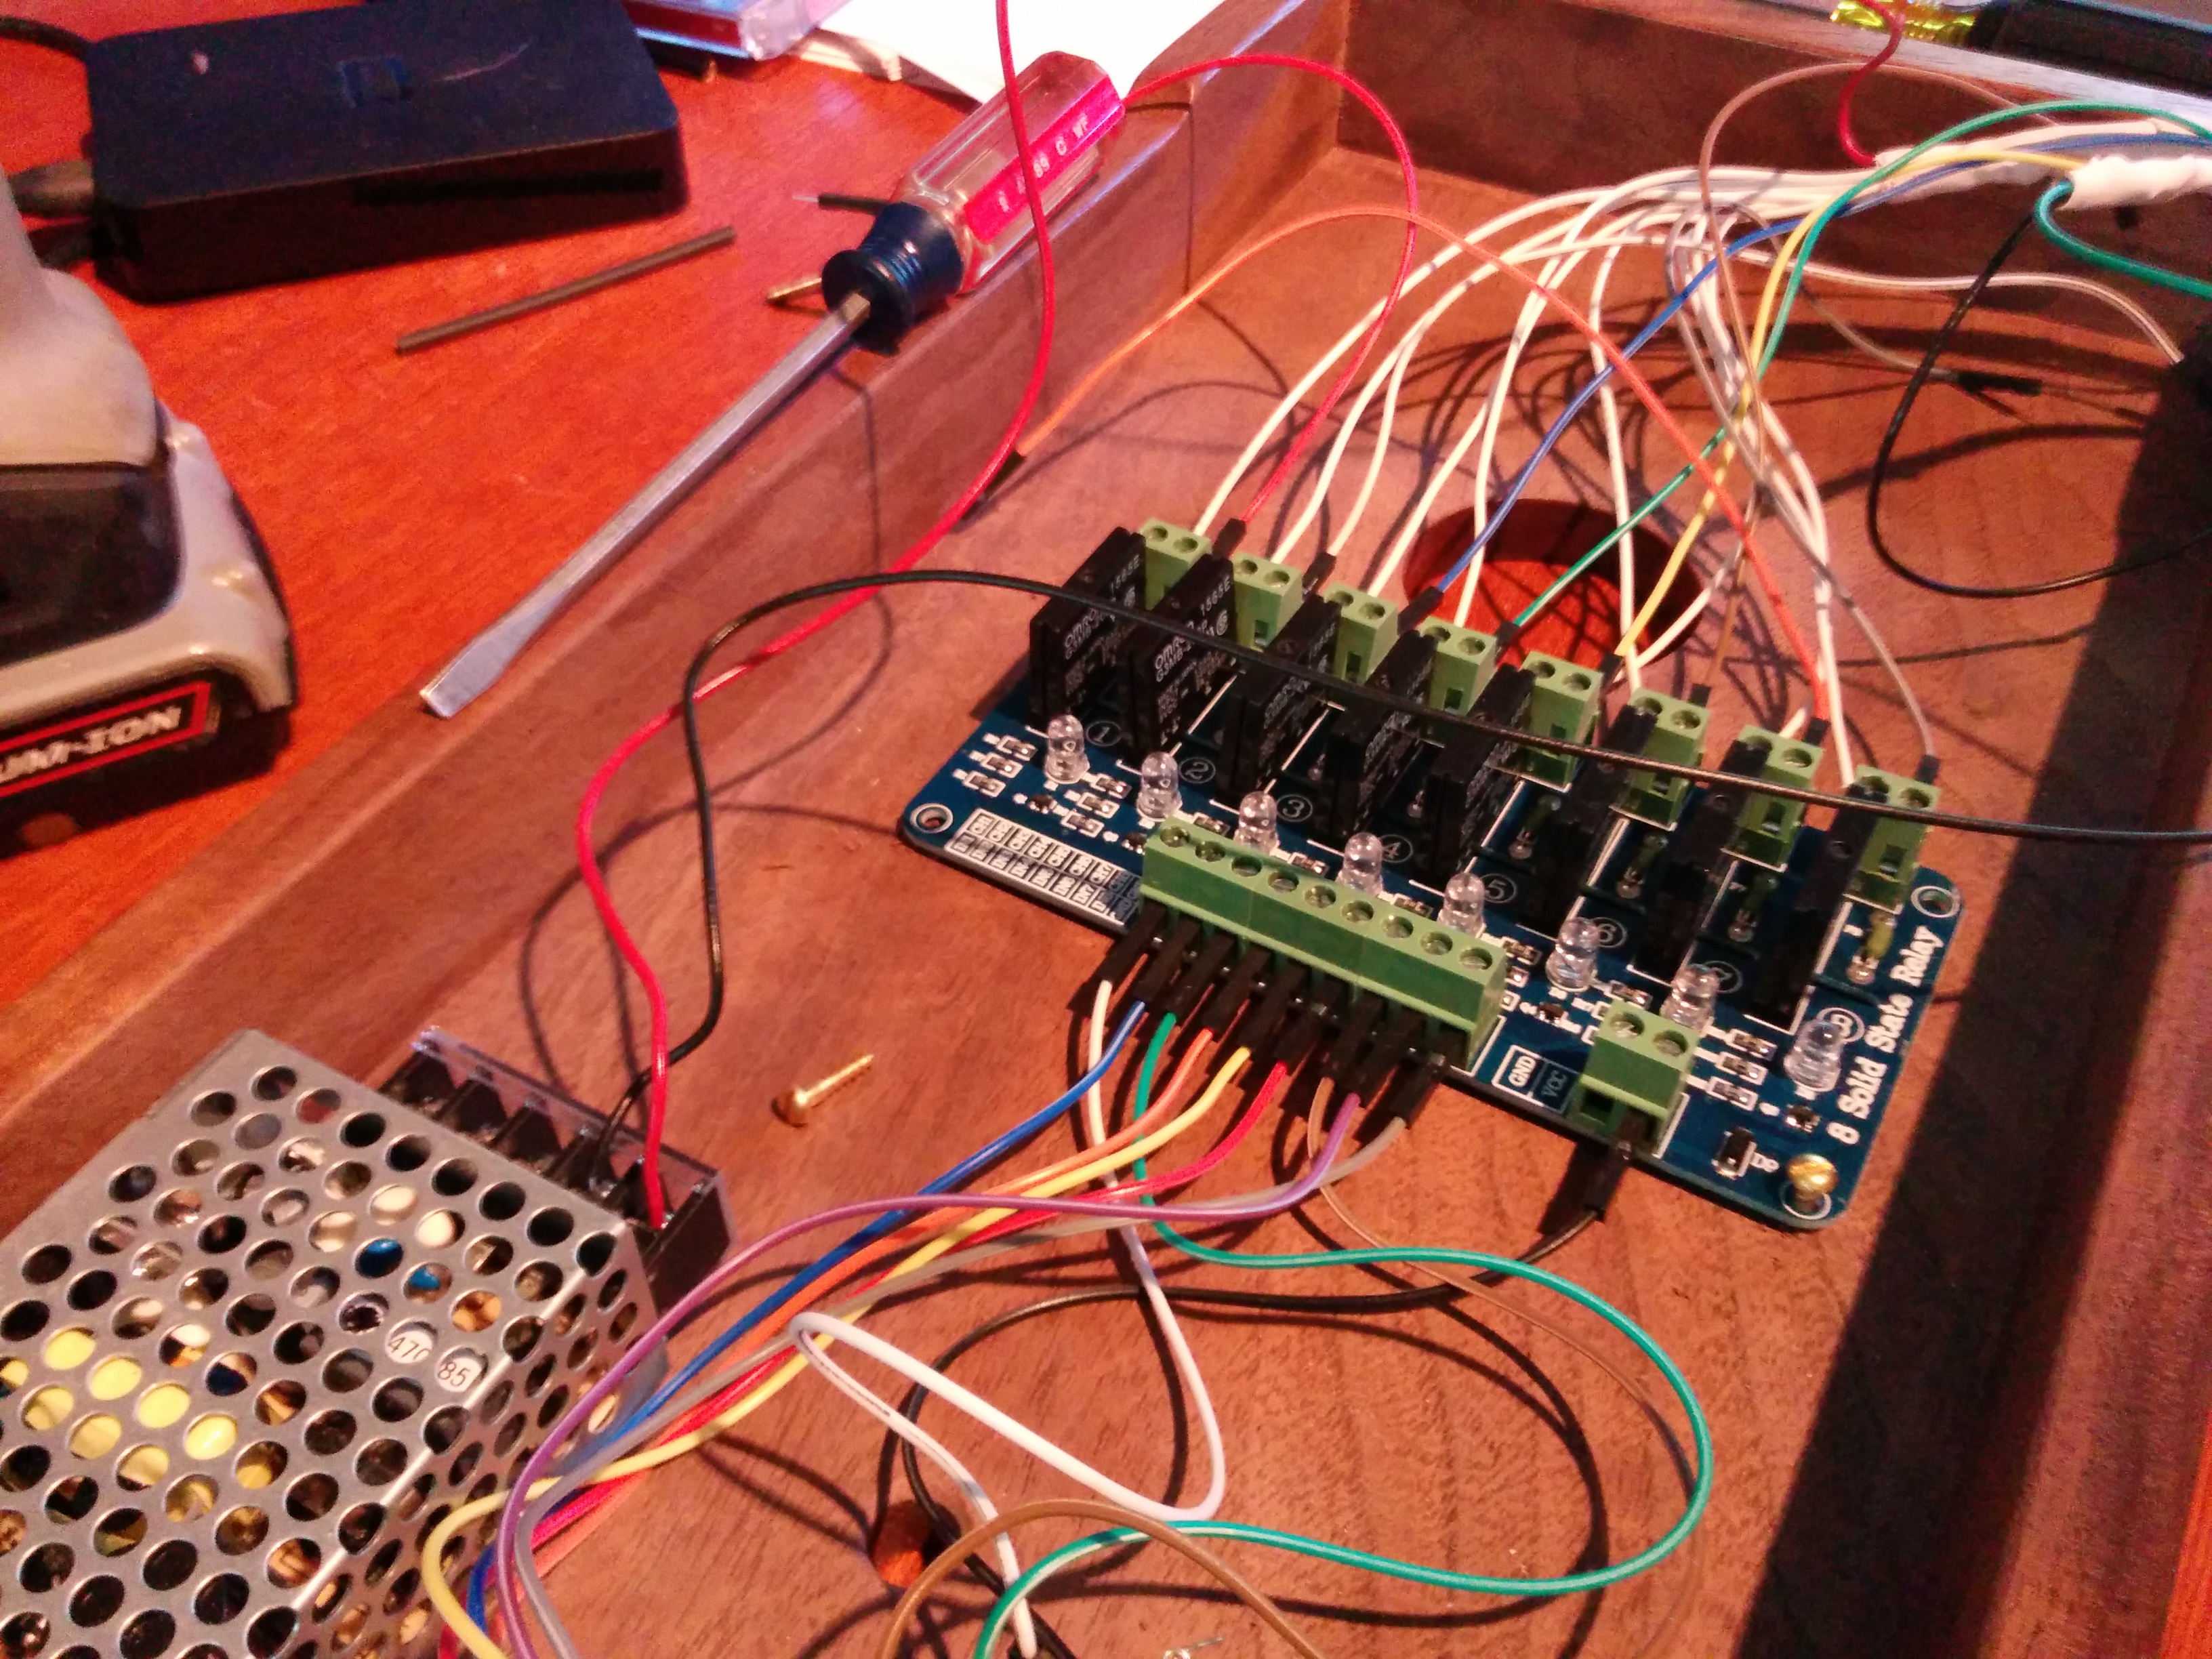
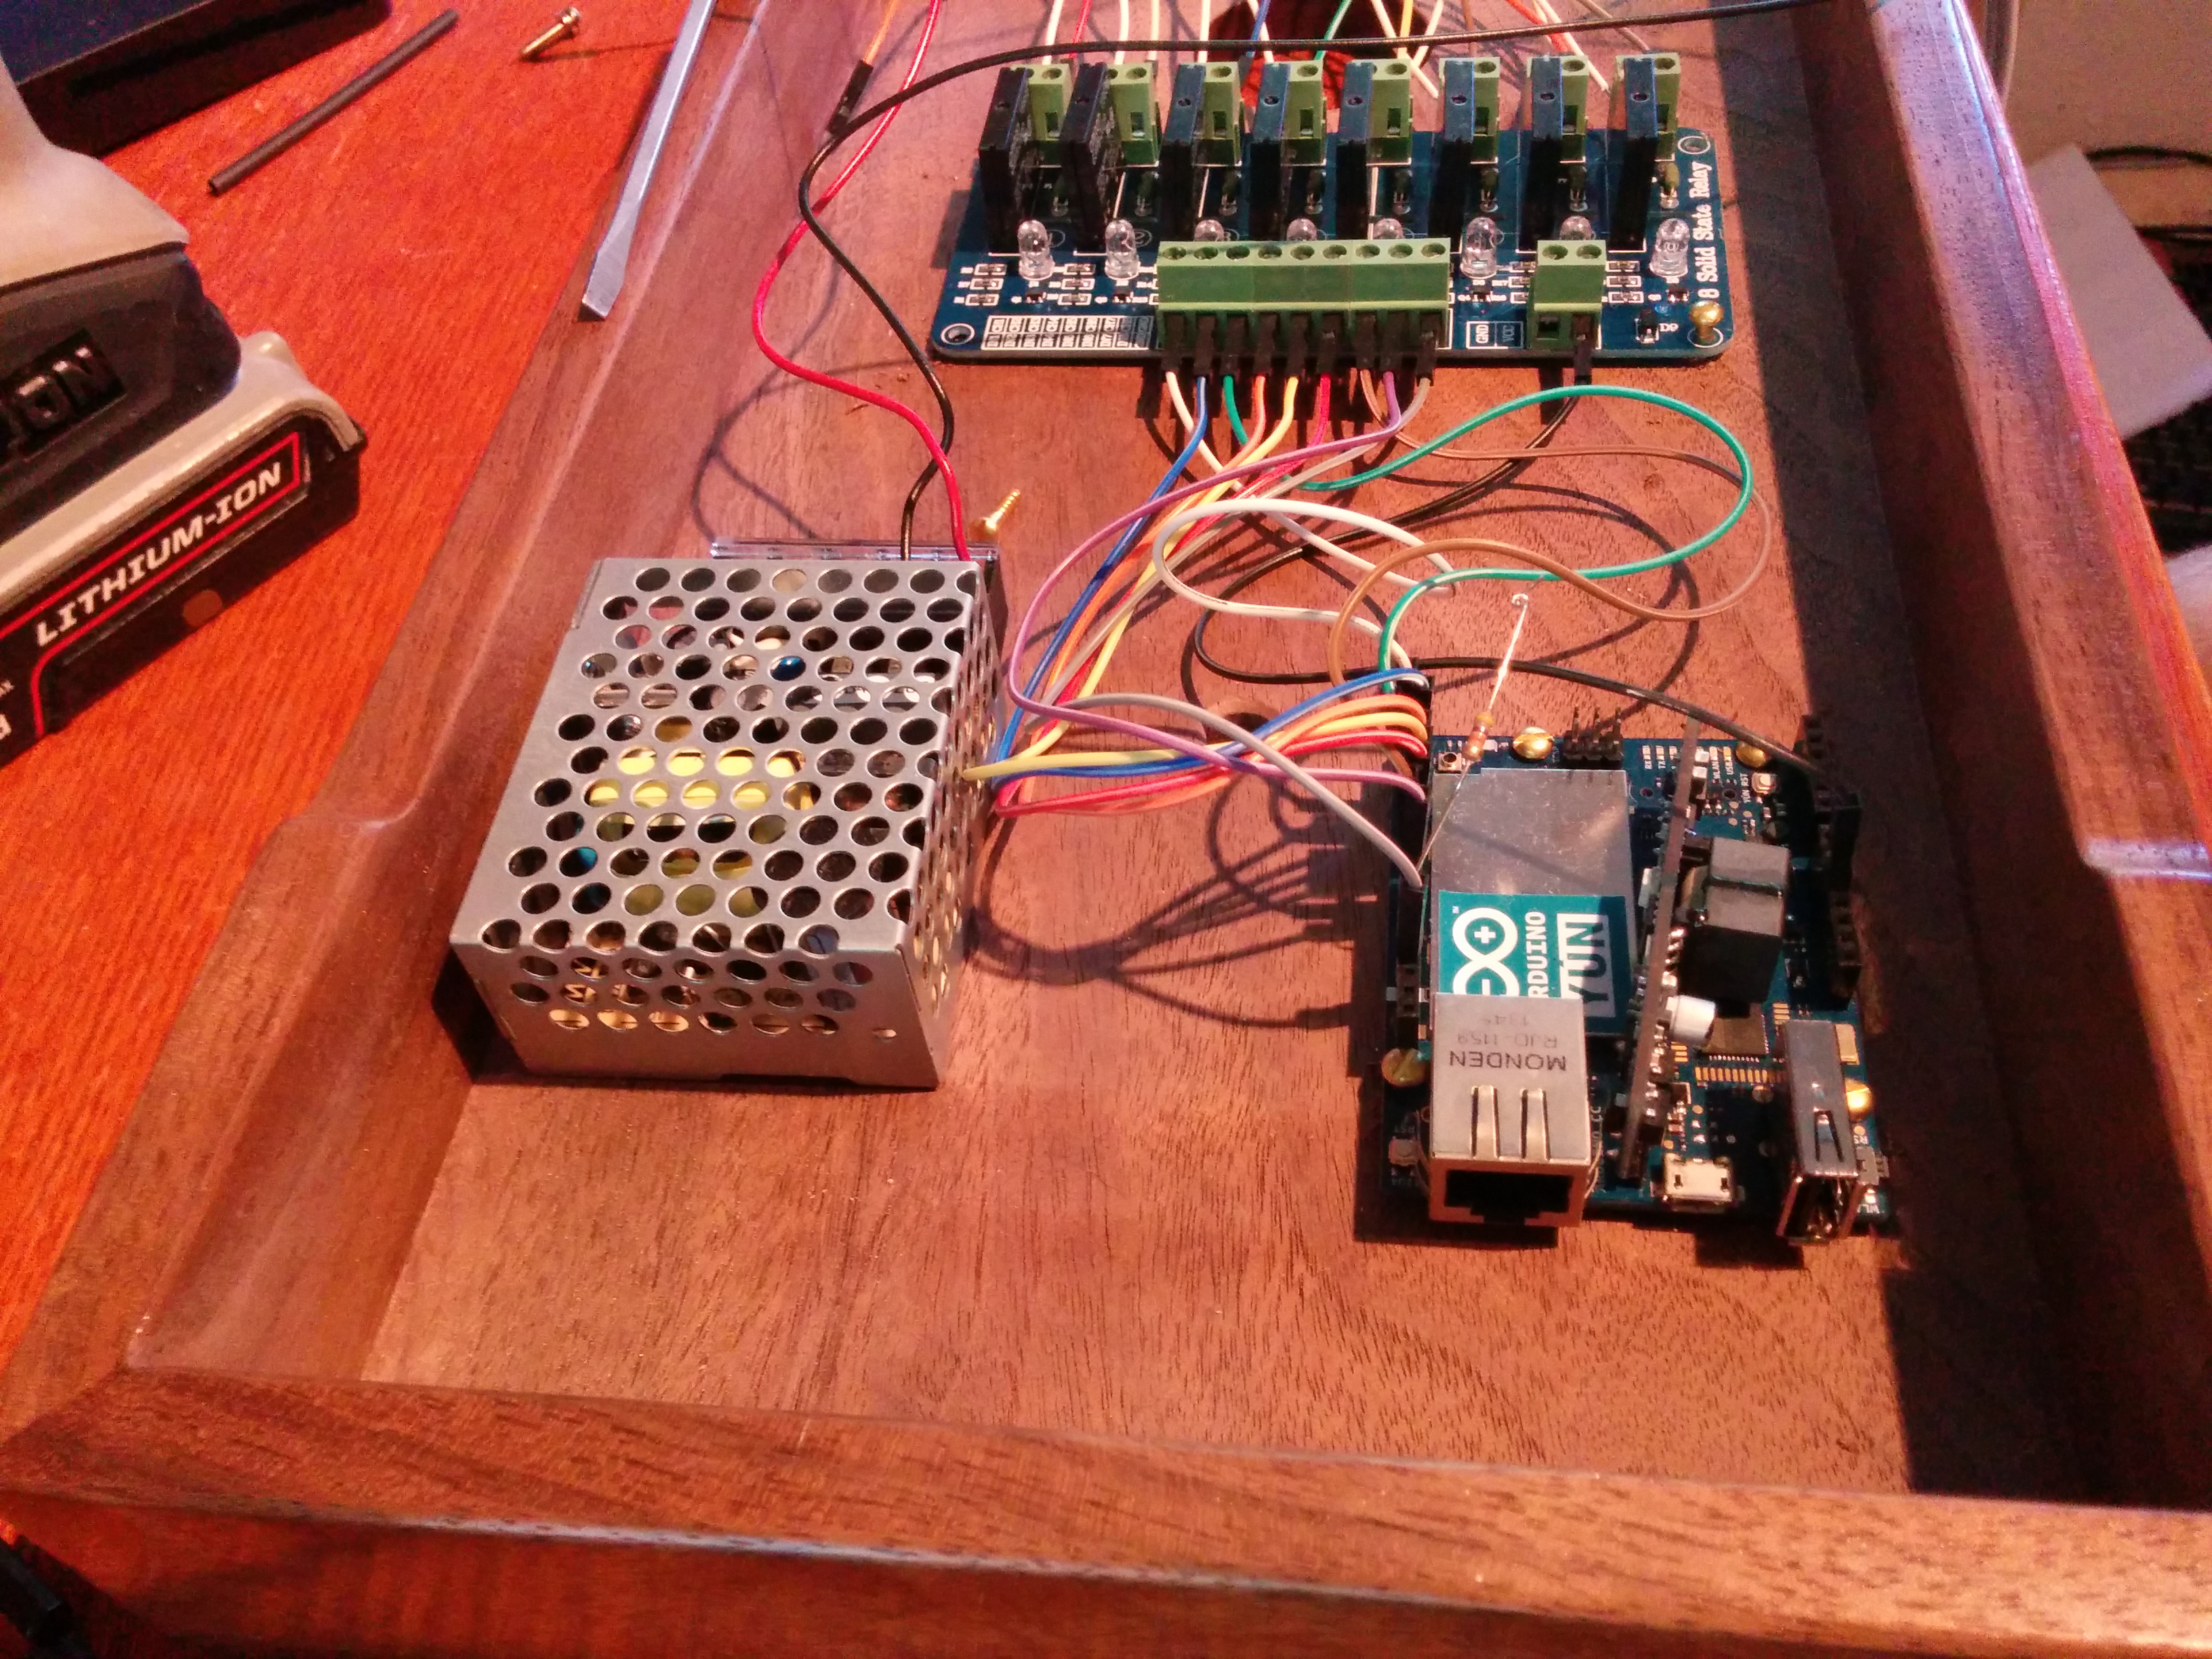
Core: I chose Arduino for the core of the panel.  I have done other Arduino projects before (I’ll write up my programmable LED tower light system later) and so I had a good idea about how I could get the boards and pieces to go together. I chose the Arduino Yun as the core, since it has wifi built in and I’ve already figured out how to feed Arduino systems commands via HTTP GET. Other Arduino systems could have worked, but this was super-simple for me to get running and didn’t require much (any) soldering, which I hate doing.  Also, the size factor would fit easily behind a board.

Weather collection system: It’s a Davis Vantage Pro, which is a nice system – the tower unit is solar-powered with a built-in panel, and it relays data back via radio to a receiver.  While it’s not obviously listed on their product pages, the version I have doesn’t have a screen at the receiver end – it’s just a little plastic box.  This was a Craigslist purchase for around $150 (new) which is a bargain. There are a bunch of speed/direction/rainfall detectors out there which will work just as well – the Davis is a bit more on the “professional” end than most might need. The receiver is USB-connected to a Mac Mini, which in turn is running WeatherSnoop.  WeatherSnoop is nice, in that it can (with the right license) show speed, direction, and all of the chart-y type of things that come pre-built into the system.  But I don’t use WeatherSnoop for that – I feed the data into Indigo 6 (which has a plug-in for WeatherSnoop) and then chart from within Indigo so all of my home automation systems are plotting from the same toolset.  I can also take action based on weather data, if I want (“Is it starting to rain when I’m not home?  Send me an SMS!”)  Now, the design of the system really doesn’t care what weather collection system it is taking data from.  The HTTP request is general enough that it could just be taking information off of Weather Underground from someone else’s station and re-writing it and feeding it to the gauges.  But since I had a live feed I figured I would use that data.

Gauges: The gauges that are most familiar to me are made by Cape Cod Wind and Weather. I looked on eBay and found a set of wind and direction gauges for $40.  Score!

Wood panel: I don’t like working with wood.  It’s fiddly, non-exact, and I don’t have the right tools.  So I paid someone to make a nice walnut mounting board for the equipment.  I know this is the “craft” part of the project, but… I’m not a craftsman in the woodly arts, so I outsource that stuff. The panel was made so it had a hollow back area about 1.75″ (4cm) deep where the power supply, arduino boards, and wiring could be hidden.  I told the carpenter to put an “air gap” on the top and bottom of the enclosure, so that there would always be the ability for air to flow up and out of the case against the wall, so that if things got warm in there the natural convection would pull cooler air in from the bottom.   Also, the cord needed to have space to come out from the back and I didn’t just want to put a hole somewhere since I hope to have this mounted at some point on a wall where the cord will run through the wall and not dangle below.

Power: The Arduino needs a regulated 5vdc supply, and I chose a Mean Well RS-15-5 power supply from Jameco, sold on Amazon for around $15.  These power supplies will work pretty much anywhere in the world on AC power, and I did a quick fine-tune on it so that it feeds out exactly 5 volts.  To hold it in place, I used bathroom mirror hold-downs from a hardware store and got some self-tapping screws that were just long enough to get a grip in the wood but long enough to clamp down on the box when put through the hold-downs.

Wires and connectors: I bought some breadboard connectors of various styles (m/m, f/f, m/f) somewhere local.  I’m sure they can be found on Amazon or eBay easily enough for a few bucks.  I didn’t solder anything other than the 110vac power connector wiring, which I also heat-shrink wrapped.

Resistors: I needed a few resistors (notably to reduce the power going to the needle gauge) and all my old resistor libraries are buried somewhere in a shipping container, so I just bought a new set of various resistors for $10 on Amazon here.

Relay board: To control the lights, I bought a solid state relay board off eBay (search for “8 Channel 5V Solid State Relay Board”) which is more or less designed to work with Arduino devices.  It had 8 relays which was perfect, since I have 8 lights in the compass rose.  There happen to be more than 8 outputs on the Yun, so I was all set to control the relays from the Yun by triggering the output pins.

Methods

The lights are NE-2 type neon lights, which take 60-110vac.   I plumbed the neutral AC line to the common connector on the back of the light panel, and to the power supply.  I then split out the hot line into 9 separate wires, 8 going to one side of each relay, and the 9th going to the power supply.  I connected outputs 2 through 9 to each of the relays, so that bringing those lines high would in turn trigger the solid state relay and let 110VAC flow to the NE-2 bulb in whatever position corresponded to that pin.

To get the needle working, I set pin 10 of the Arduino to be analog and acting as a pulse width modulated signal.  This means that the voltage pulses on the line, so that it “fools” the end device into thinking that it has a lower voltage.  For an analog needle, this is pretty much perfect.  See more on Arduino PWM here.  I did a little tiny bit of math to convert the MPH value to a 1-255 value on the pinout.

I put a 41k resistor (yellow/brown/orange/gold) in line with the output of pin 10 on the Arduino. This reduced the voltage on the output to match what the needle required, so that at a setting of 255 the needle was at the 100mph (maximum) value.  Comparing the settings across the speed range seems to be pretty close (within 1mph) of what I’m looking for.

I used brass hardware to fasten the plates to the walnut board on the front and the boards and control circuits to the back, drilling much smaller pilot holes after carefully measuring and marking placement on the board.  I made sure that the boards had nice thick wood, so I could be a little sloppy in the length of my fasteners and not worry about punching through to the finished side.

Here’s the assembly during and after construction:

IMG_20150607_180157  IMG_20150607_180204   IMG_20150617_151129

To activate the device, I wrote some code.  I won’t go into the details here – look at the code for more information.

Arduino Windspeed/Direction Code

The gist of it is this: connect to port 80, and create a fetch like this:

http://x.y.z.a/arduino/direction=<compass>&speed=<speed-in-mph>

The <compass> value can be in degrees, or it can be one of N, NE, E, SE, S, SW, W, NW.  There is very little (no) error checking, so it’ll happily fail silently if you feed it indigestible data.

If there is no data sent within 60 seconds, the “N” light will start to flash as an indicator that something has gone wrong.  You can of course tune this in the code to some higher value if you think that 60 seconds is too short, but I like the updates to be fairly rapid so I am automatically updating the indicators every 7 or 8 seconds.  Also, when the device boots it will spin through the compass lights to test them all.  I have my Arduino’s MAC address fixed in my DHCP server so it’s always on the same IP address, so my Indigo systems knows where to go to set the speed/direction.

Notes

– I had to update my Yun firmware – the firmware it came with had some sort of error that would cause my sketch to fail about 20 minutes after bootup and the lights/needle wouldn’t change.

– The NE-2 bulbs may actually not work well at 110vac, but they seem to be doing OK so I’m going to leave them alone.  The manufacturer (Cape Cod) recommended a 56k resistor on each pole of the power going to them, and there is even a warning written on the back of the dial about it.  If anyone has comments on why I should put those resistors back in, let me know.


Mac to TiVO: Instructions

Sunday, January 9th, 2011

I became sidetracked (as I often am) last night with learning a new trick I didn’t know I could do: uploading files to my ancient TiVO Version 2.  I know the newer ones support this, but I didn’t realize my older version did.  It seems to be a little bit of a hack, but it’s working, and now I’m watching Buckaroo Banzai on my TiVO from a file I had stored on my Mac for some time.  (Copyright note: I own the DVD for Buckaroo Banzai, as well as the laser disc, several VHS tapes, book, etc. etc. – I’ve paid plenty for the rights on this film for my personal consumption.)

My Mac is running 10.6.5.  I downloaded the TiVO Desktop tool, which allows sharing of photos and music from the Mac to TiVO devices.  But there’s a secret option – video sharing, as well!  If you hold the “Apple” key (aka: option key) down while opening up the Systems Preferences pane for TiVO Desktop, you’ll get an extra tab which says “Videos”.  It’s probably a good idea to use the default directory it puts there (~/Documents/TiVO Recordings)

I then downloaded ffmpegX for Mac to convert the .avi files I obtained into MPEG2 files that the TiVO can understand.

Drag the .avi (or whatever you have) file to the ffmpeg window, or select “Open…”

Settings:

1) The “Save As…” filename MUST end in “.mpg” otherwise the TiVO desktop won’t see it.  There is apparently a cron job or something that the TiVO Desktop runs that scans the video folder you specify, and then the file is added to the video list.  A file called “filename.properties” is created at the same time, which contains some meta-information about the file.  This sometimes takes 5-10 minutes to happen, so be patient before you run out to the TiVO to see if the file has appeared in your video directory.

2) Video window:  I set the codec to “MPEG2 [.MPG] (ffmpeg)” and then manually set the bitrate to 2500.  The maximum video size for the TiVO is 352×480 (found in this post that had some good information) so that is the maximum you can work with.  I set Autosize to 4:3, and framerate to NTSC FILM  for my experiments, and haven’t shifted them.  Now, here is where it gets tricky – many films you’ll get are in a different aspect ratio, and when you squash them into a TiVO non-HD screen size of 352×480, they’ll look weird and horizontally crushed.  Everything will be distorted.  So what I did is set a letterbox (see step 4) which was 60 on the top, and 60 on the bottom.  This means that I had 120 vertical lines of letterbox added to the frame.  ffmpegX doesn’t subtract letterbox from the frame size specified in this window – it adds it.  So I had to subtract the 120 lines from my vertical height, meaning that I specified the frame size as 352×360.  If you do NOT want to use a letterbox specify 352×480 here to get maximum frame size.  I found that 4:3 worked fine without letterboxing on some other videos I had which were not quite so wide.

3) Audio window: I set the codec to “.AC3 (Dolby Digital)”, at 128kbps, 48000 Hz, Stereo, CBR.  Audio track I left at 0.  I tried leaving this as “Passthrough” but that didn’t work.

4) Since Buckaroo Banzai is in wide aspect (a strange ratio – 2.14:1 at 720:336 – is this HD?) I chose to set a letterbox.  Now, the top and bottom letterbox black areas that I chose are not the “right” size to get this down to 2.14:1, but if I had made the boxes big enough to do that I think the viewable area would have been too small, horizontally, so I just chose 60 and that got rid of enough of the “crushing” effect for me to watch the movie without the video appearing overly scrunched on my non-HD TV.  (Sorry, I watch too little TV to buy a wide-screen or even a digital TV – I’m using a 1991 Trinitron, and it’s just fine.)

5) I specified “High Quality” on the Filters tab.  I have no idea what that does, but sure, why not!  High Quality.  Caviar and golden dishes for all my videos!

I didn’t mess with anything at all in the “Tools “tab.  I then pressed “Encode” and about 10 minutes later… voila!  I went to the “Now Showing” option on the TiVO, and at the bottom of the list of recorded programs there is now a new item with the name of my computer. Entering that menu, I find “Buckaroo Banzai” now in the list – I start the download, and I’m on my way!

Errors/Troubleshooting: I found that if the frame size was off, I would be able to view the video and see what was being displayed, but the video would be shifted off the screen, or would have horizontal lines through it or otherwise be mangled.  It seems that getting the frame size correct and within that 352×480 box is important.  I also noticed that when the TiVO is actively downloading, the video stutters a bit while you’re watching anything in playback mode – not terribly bad, but noticable.

Hint: you can modify the “filename.properties” file  – it’s just a text file which will be fairly obvious.  It’s useful to put in the methods by which you encoded the files, so you can recall how you tweaked a certain recording in the future for experimentation.  Others have tried adding more data, but it doesn’t look possible easily.

Here’s what mine looks like:

Have fun with your antique TiVO!  I probably won’t be able to answer any questions for you, since I’m just guessing on all this stuff, myself.

JT

App for sale – factory fresh, great condition, low miles

Thursday, January 6th, 2011
gocraigsy.com logo

gocraigsy app logo

I’ve got an iPhone app to sell, since it’s just sitting around collecting dust and I know it can be a kick-ass, profitable app with a cult-like following with only a little work.  Read on…

I’ve been a big fan of the craigslist.org site for quite some time for buying and selling things.  The interface is lightweight, it’s fast, and it’s not overburdened with all the mud that sites like eBay insist on covering themselves.  A few years back, I had to post a bunch of items on craigslist, and became frustrated at the terrible interface that they have for posting – it’s burdensome, slow, and impossible to use on a smartphone.  The iPhone had just come out, so I started the slow process of developing the specs for an application that posted craigslist “for sale” items right from the phone, using the built in camera and having some intelligent template designs for ease of use.

In late 2008, I finally got a good functional specification together and started working with a group of Eastern European (Ukraine) developers with whom I’d had good experiences in the past.  I gave them the spec, and they seemed to think it was a decent app.  They were super-flexible, and agreed to do the work for cash plus a percentage of the “profit” on the proceeds from the Apple iTunes store sales on the software.  To make a long story short, this was their first iPhone app and development took a bit longer than anticipated, but it did eventually come together.  I called it “GoCraigsy” to include the concept that it was a craigslist app, and also that somehow perhaps it was for craigslist fanatics.  I couldn’t come up with anything better, so… that’s what it’s called.

In February of 2009, I launched the app with a selling price of $3.00.  I figured: if people were going to be selling things with the app, they were recognizing real, actual money from the use of the app.  Not too many other applications can be directly linked with cash finding its way into your pocket… so this was a sure-fire winner, right?  So it turns out that people are cheaper than I had considered.  The $3 starting price was a flop – probably only 20 copies sold in two week.  OK, I said, let’s try a quick giveaway for a day or two – wow, that was an eye-opener.  I think I was shipping five copies a minute for almost a day and gave me great feedback and use on the app for 24 hours and so I figured “Well, maybe I’ll price at $1 to see what happens.”  Again, the downloads slowed to a trickle as soon as I gave the app a price.  Interestingly, the people who did download it used the HELL out of it – one person posted something like 200 ads in a one month span.  I could track this because there is a keyphrase the user could opt to put in the ads, and I would just search on that to see how many ads were posted with it.  I also added up the dollar amounts for a while of the items listed for sale, and lost track after it hit the $250,000 mark.  The free users were just as active as the paid users, and even today a year or so after I turned the app off and took it off the store, at least one person launches roughly every other day.

What happened next?  Well, I got tremendously busy with my day job, which sucked a lot of wind out of my sails for doing side projects.   The income was pretty low – maybe 3-4 people per day purchased it.  The app worked great for about two months, and then craigslist changed one of their form values.  This is a pain, because many of the parts of the code look at the page format on craigslist and parse those into various places to make it appear that the app is a person (this allows me to create the fast and “nicer” UI that is iPhone-friendly.)  So the app broke, and I had to contact the developers to get tiny tweaks done, and then had to re-sign the app and get it sent back to Apple for an update.  But the iPhone development kit isn’t simple, and I really really hate it.  This time around, it gave me huge problems signing the app and getting it uploaded, so I threw up my hands in disgust and haven’t touched it since.

I’ve not even looked at it much since then, and honestly I suspect I’ve lost my taste for iPhone development, at least where I’m supposed to be the guy out there astroturfing about what a great app it is and putting up ads on websites and shilling on MyFavoriteiPhoneAppBloggyBlog.com.  I’m a great promoter of other people’s software, but when it come to my own I suppose I’m just not as enthusiastic for some reason.  So I’ve decided that this needs to be sold, not simply for the money that I could get from it, but really because I want to see it live again – I want to USE this software, and someone needs to become the maintainer of the code and hopefully the reaper of the profit.  I’ve got too many irons in the fire right now, and I’m trying to trim down the number of projects I have on my mind.  This one has been lingering, so it’s time to do something with it.

Since I left it last, two significant things have happened that could make this app more interesting and profitable with a little work: Apple has introduced the concept of “micro-payments” on the iPhone platform via their in-app payment system, and just as importantly, the iPad has come out.  The combination of these two elements I think can make this a winner application.  But much more importantly in the recipe for making this a great application is the ability for the app to be shepherded by someone who is a fantastic promoter of iPhone apps.  I’m famously terrible at self-promoting, so this app probably failed not because it wasn’t awesome, but because I can’t advertise appropriately.

I have a few ideas (well, three) that I think would turn this software around.  Micro-payments is obviously one, though the details and the other idea I’ll hold onto until someone wants to have long conversations about this application.

There have been a number of craigslist-oriented applications that I’ve purchased or tried on the iPhone.  Many of them are wonderful for browsing ads.  A few of them even allow ad posting.  But they’re all terrible.  Universally.  Don’t believe me?  Try them yourself – I won’t name names.  They’re awful, if they work at all (most don’t – they crash or error out.)  The UIs are terrible, they don’t support templates, they default back to the browser interface (sometimes in a window) and they’re just plain garbage, and I’ve verified this even as of  last night.  The methods I used were complex and in some ways a bit fragile due to craigslist’s lack of an API, but it WORKED and the experience was light-years better than the apps that currently exist on the marketplace.  More importantly, it was faster – LOTS faster – than any of the existing apps for craigslist posting, and this really appealed to me (and quite a few people who wrote to me about it.)   Posting an ad took around 35 seconds, including pictures (but excluding the time it took to type the description, which is a “fixed cost”) and that’s pretty snappy.  For someone like myself who wants to wander around the basement and take pictures and sell a whole lot of stuff, that’s exactly what was needed in a craigslist app.  As a sidenote: I’m inclined to think that the people that run craigslist are not so friendly towards their users, otherwise they would have developed an API by now to allow all this stuff to work without the gymnastics.  Every message I’ve sent them has gone into a black hole, and other developers have experienced outright hostility or legal threats.  They don’t seem to realize that real, actual humans want to do things for the right reasons, with the right controls, and not everyone is a spammer.  This is despite their existing system failing to manage the spam problem via the web interface that is the weak link in their process.  Apps like this, if done the right way, could solve a significant problem they have today.  It’s a mystery, folks… but that’s neither here nor there.

So what are the details on what I’m selling?  There’s a server side and a client side, though the server is just a dumb web server that feeds out templates for day-to-day changes.  That’s on the www.gocraigsy.com server, which is a VM ($20 a month?) somewhere.  You can go to that page and even watch a video of the way the app works.  I’d be interested in selling the server, the domain name, the source code, the specifications, and all the code on the server (which isn’t much – just a few support scripts.)  You’d need to get an SSL certificate to make it work (it only talks HTTPS to the template server) and you’d need to have an existing relationship with Apple – I’m not selling my company, which is the entity that can transact business with the Apple iTunes store.  You’ll probably need to have prior experience developing iPhone apps, otherwise this is probably too much of a hassle for you to learn on.  You’ll need to have the ability to convince me that you’ll be able to send me money.  I’m open to a combination of cash and/or percentage of income from the iTunes store (sorry, can’t work on “profit” – too complicated.)  I’d like to make sure my Eastern European developers eventually see some money out of this, as well.  However, don’t let this frighten you – I’m not greedy.  Your next question is “Well, how much are you charging for this?” and the answer to that is actually quite open.  If you were paying just cash, it would be quite a bit – there are hundreds of hours of development and effort in this app, and I do have my stupid sense of honor.  If you’re thinking about purely percentage, then that might actually work better, since I’d like to see this app running again and it puts my money where my mouth is – if I didn’t think this was an amazing tool that other people eventually will find useful and worth paying for, then I’d be shy of a percentage deal.  However, a cash + percentage deal would work as well, since that will reduce my percentage requirement.  Up to you, but assume I’m not going to give it away.

You will almost certainly need to do some tweaking to get it running, but it would be minor.  I’m sure craigslist has changed some style elements on their pages which will  have to be managed.  But that is about 1% of the work of this app – there’s a lot of stuff going on in the background that is pretty fancy, and would take quite a bit of time to reproduce.  This is nearly a ready-to-wear application, but it’s not a game or another @#%(@#%@#% flashlight app – it’s a useful, network-based tool that interacts with a very complicated commercial platform.   It’s amazingly useful, has a significant value to the user base, and is almost universally interesting to anyone who has something sitting in their garage that they want to sell.  Sounds like a winner to me… why don’t you take it over and make some money?

SSH over UDP: How to swallow an elephant

Thursday, December 16th, 2010

(this is a rehash of a message I sent to a private list.  Those of you who aren’t interested in theoretical network discussion, read no further.)

I just got back from a very successful network rollout (100mbps in 4 business days, to a government building no less) that ultimately failed because of the limitations of TCP and latency – the servers to which the data was being sent were too far away to have reasonable throughput.  After some thought, it seems that my problems could have been resolved if I was just streaming dumb packets (UDP) instead of TCP streams that required the ~150ms ACK round trip.  I know I can’t be the first to encounter this, and it would seem that in these edge cases some TCP-over-UDP method of packet delivery would be suitable despite the hackiness of the solution.

My goal: move large packet streams over mildly (max 5%) lossy network elements with long latency (max 600ms) but high bandwidth.  A 100mbps pipe is worthless if you’re trying to move a 10gig file across a trans-continental (or further) link with any realistic latency or even the slightest packet loss.  But if you’re prepared to re-send some data and hold things for a few seconds in buffer, it seems like a vast speed improvement could be obtained.

It seems that UDP would be an ideal way to transmit large blocks of data, with a very large buffer at each end and a non-sequential retransmission strategy for lost packets. This would not be simply re-writing TCP over UDP, with the inherent ACK path for each datagram.  It would be a larger re-write, with large blocks of datagrams collected and ACK’ed in reply packets, with re-transmits possible within the buffer pool and not just at the very end of the buffer pool.  This seems do-able, given that most modern machines have VERY large memory capabilities and the network is typically the weak link.  This might lead to “bursty” output while waiting for blocks to complete during retransmits, but I’d think that the output would be much larger in size over the same time period as that of a comparative TCP stream.

The goal here is not requiring kernel access, and no demand for any control over network elements in the path.  This should be 100% user-land accessible for installation on generic UNIX style hosts without root permissions.

Yes, I have done a bit of Googling on this, but there’s a flood of responses.  Iproxy seems to be for multicast.  bbftp is interesting with the multi-stream method, but is limited to file transfer and not generic TCP connections.  atou seems to require heavy kernel modifications on each side.  I found some ssh-over-UDP sites that are blurry in their details, and they seem to not be sophisticated at all – still blocking at the point where ACKs are requested back on a packet-by-packet basis, and not blasting out huge piles of data and then selectively backfilling if there are drops reported by the receiver.

It would seem to me that SSH would be a great place to shim this in.  The number of services that can run over SSH is growing, and the tunnel capability (both UDP and TCP) and port re-direction seem to be an already versatile set of methods that would benefit from such a shim component to increase bandwidth.  It also has the advantage of having native file transfer (scp) that is well-supported.

Anyone have any ideas on research on this that has already been done, or shim layers that already exist to take advantage of UDP’s fill-the-pipe methodology?  Looks like some people have done experiments, but the data is obscured (paywall) and/or it is unclear that what I’m looking for has actually been attempted.

JT

notes:
http://www.csm.ornl.gov/~dunigan/net100/bulk.html
http://www.csm.ornl.gov/~dunigan/net100/atou.html
http://doc.in2p3.fr/bbftp/
http://horms.net/projects/iproxy/
http://code.google.com/p/udptunnel/
http://publications.lib.chalmers.se/cpl/record/index.xsql?pubid=123799

update: Several people replied to me privately, with these for-pay options which seem to do pretty much what I’m talking about.  A free (open source) variation of this embedded in SSH might be a game-changer.  This seems well within the range of a graduate CS project.

http://www.dataexpedition.com/
http://www.asperasoft.com/images/Aspera_Technology_Capabilities_2010.pdf

Miniature GPS tracking device w/GSM

Thursday, July 1st, 2010

Some of you may know I had a company some years ago called “10-20.com” which did vehicle tracking with a combination of satellite and GPS systems.  The gear I used was based on the Orbcomm 2-way LEO satellite system, and I had some experimental modules that used GSM as a terrestrial data delivery path.  The problem with the GSM was twofold: the equipment was fragile (wires) and I couldn’t find any GSM providers who would sell a GSM chip without voice service – they all wanted at least $35/mo for a “package” deal.  Oh, and the GSM modems were another $250 on top of the $500 for the Orbcomm devices.  Well, times are finally changing.  I found this device today that only speaks GSM/GPS but it’s fairly sophisticated after looking at the manuals, and $89!  Very nice.  The downside is that it will only work with GSM networks, so if you’re out in the middle of nowhere it won’t be able to upload its data.  The upside is that it’s cheap.  There is a company called Numerex which supposedly sells SMS or GPRS-only account chips, but I haven’t seen any evidence on their site that it can be purchased by “mortals”, but it’s a start…

The device (Shenzhen V-SUN Electronics Co., Ltd. model TLT-2H):

http://www.dealextreme.com/details.dx/sku.22968

The manual:

http://www.v-sun.cc/asp_bin/downfile/201061917138726.pdf

And another link to the same device:

http://www.power-grand.com/product_vie.asp?PID=1140